All guide chapters
Start here
Everyday running
- Residents
- Rent and payments
- Dues and reminders
- Deposits and advances
- Expenses and profit
- Mess and meals
- Reports and dashboard
- Laundry and food for residents
- Importing residents safely
- Room changes, checkout and resident requests
- Payment approvals
- Billing periods, installments and rent reviews
- Room electricity and resident charges
- Utility connections and bills
- Inventory and room assets
- Bank accounts and wallets
Filling your beds
Your team and residents
Adding residents and assigning rooms
A resident is a person; a booking is that person in a bed, for a period, at a rent. Adding someone and giving them a bed are two separate steps, and that separation is what lets people move rooms without losing their history.
Step by step
Where to go: Residents → resident list; Residents → Check-outs for leaving residents
Who can use it: The hostel owner, or staff with access to this feature. Some actions need additional permission.
-
Create or find the person
Search the existing residents first. Create a profile only if needed and verify private contact details.
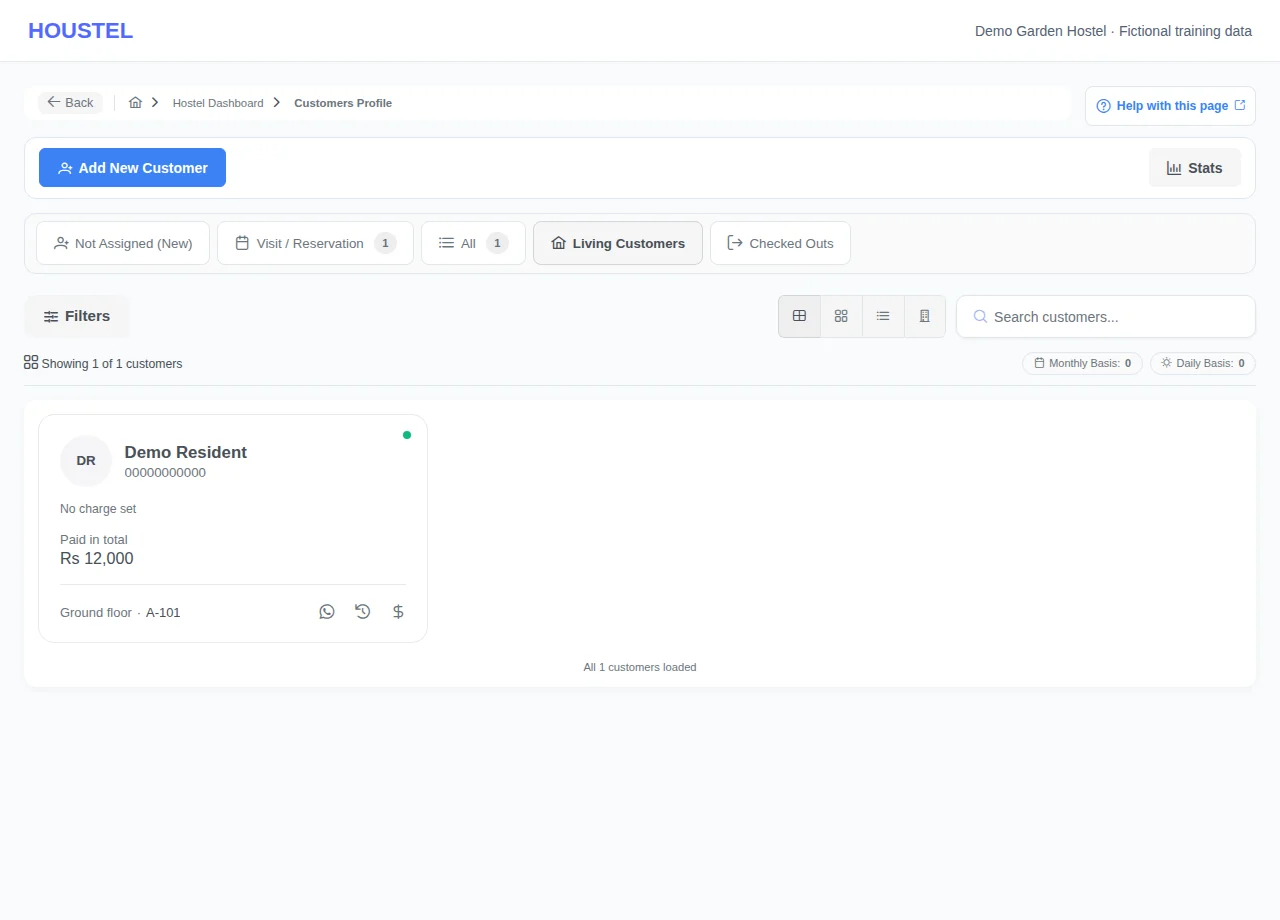
Create or find the person · Example with dummy data. Select the image to enlarge. -
Choose what happens after saving
Register Customer opens a window that stays until you choose: Assign a room opens the booking form for this person, Add guardian details adds a parent or relative now (optional), and Register another customer empties the form for the next person.
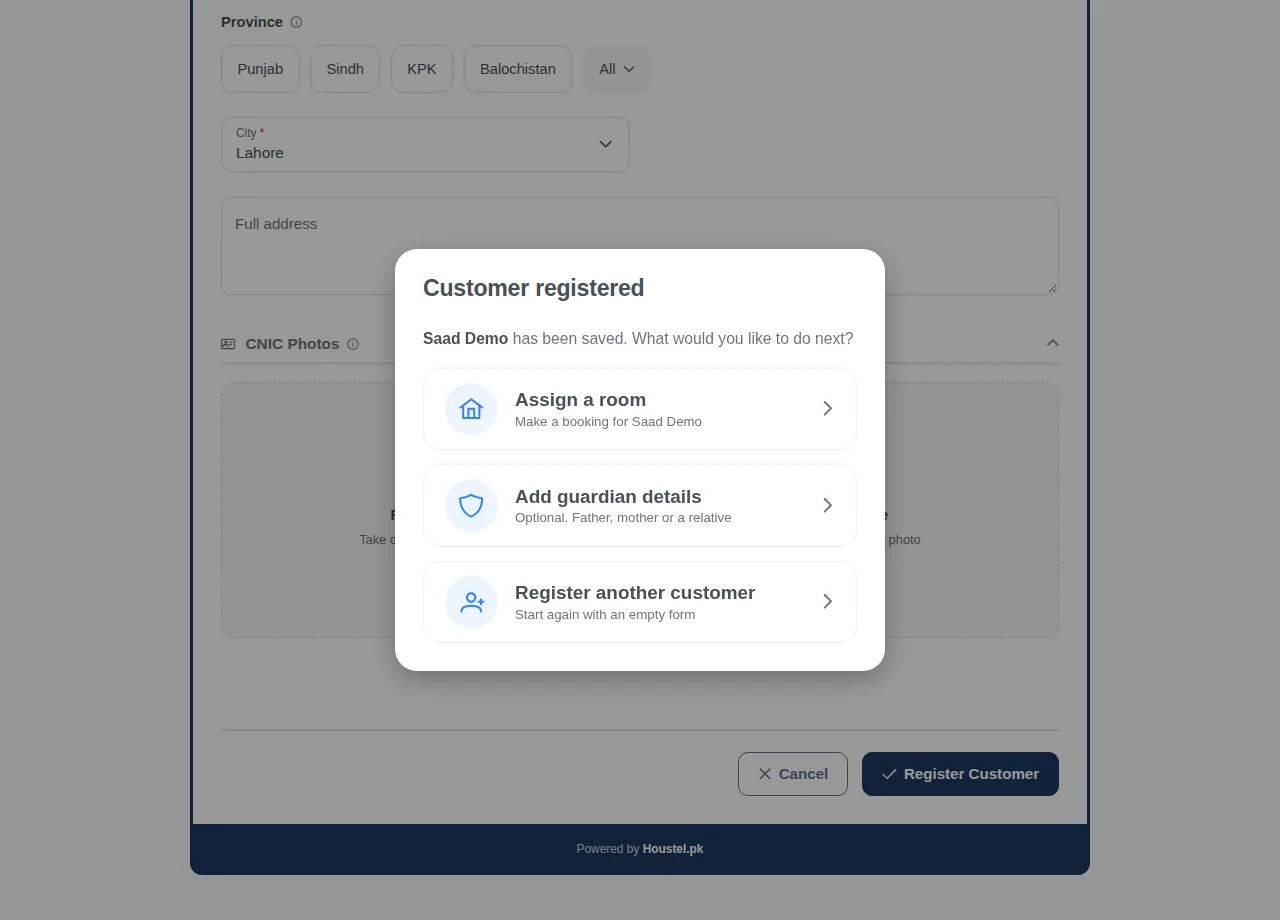
Choose what happens after saving · Example with dummy data. Select the image to enlarge. -
Add guardians
From that window, or later from Guardians on the resident's profile (under Family information), choose Add guardian. Only the name is required; relation, an 11-digit mobile number, a 13-digit CNIC, email and a photo are optional. Up to five per resident. A father's name and guardian's phone typed on the registration form are filled in for the first one.
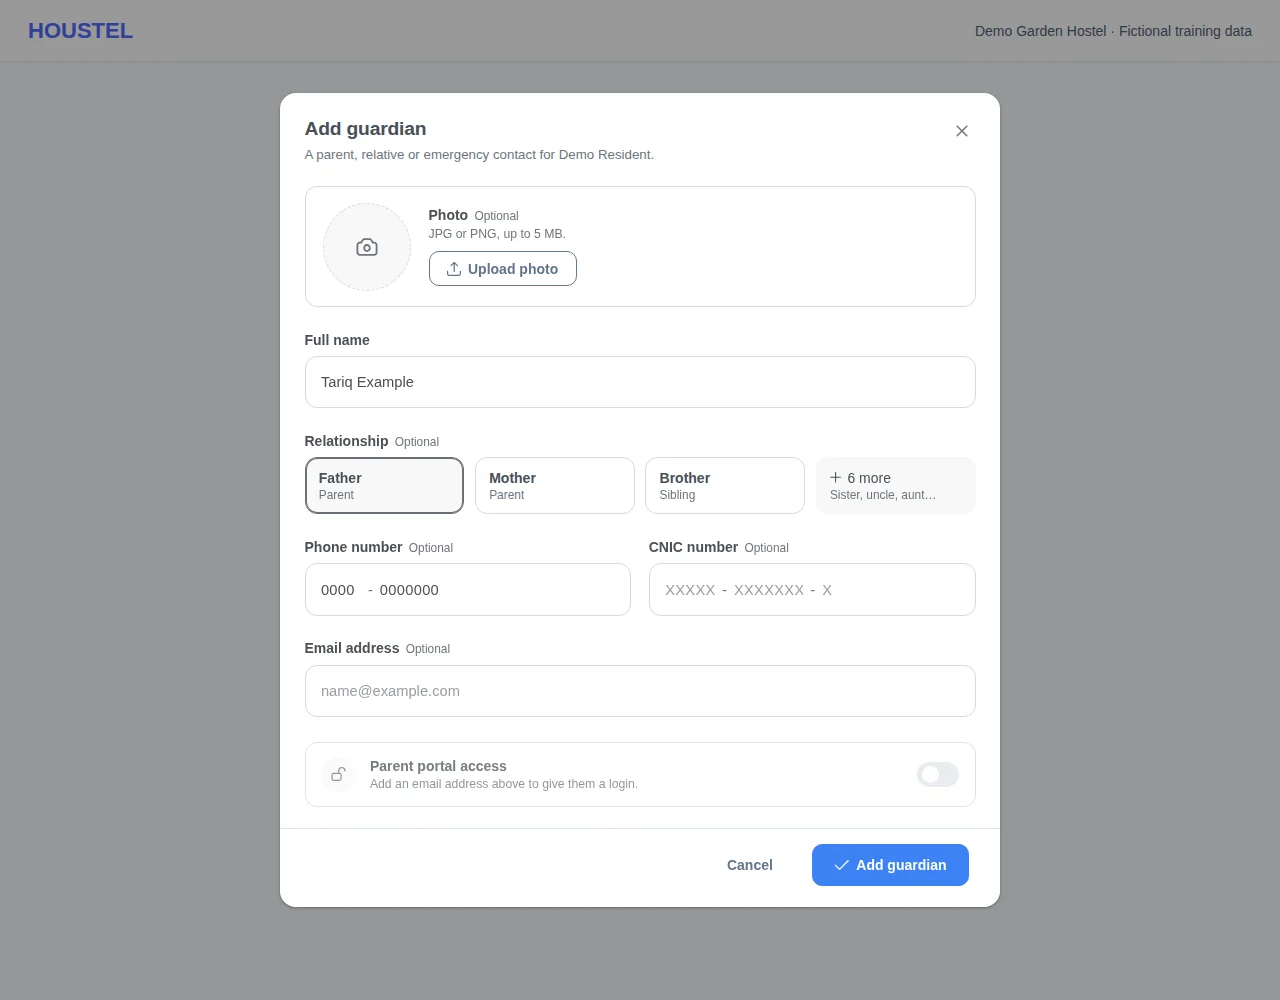
Add guardians · Example with dummy data. Select the image to enlarge. -
Give a parent the portal
Switch on Parent portal access in the guardian's window (it needs an email) and save. A new parent is emailed a link to choose their own password, good for 3 days; the guardian shows Invite sent, with a button to send it again, until they do, then Portal access. They see this resident's room, payments and dues and gate attendance at your hostel only, and cannot change anything. Switch it off, or remove the guardian, to end it at once.
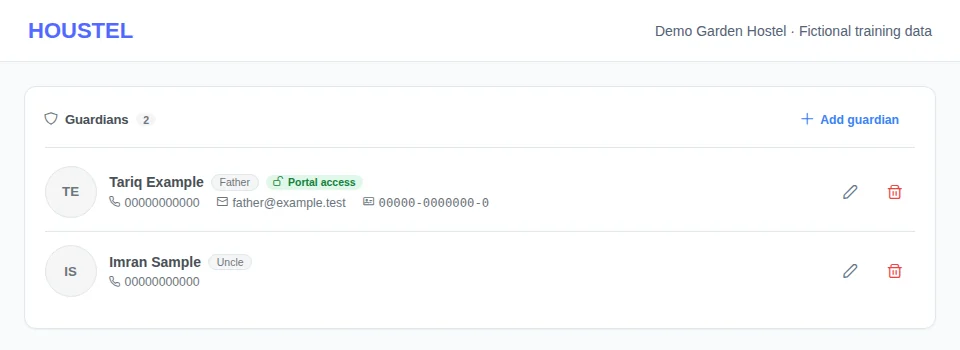
Give a parent the portal · Example with dummy data. Select the image to enlarge. -
Or let people register themselves
Residents → Add New Customer → Share Link → Generate New Link. Name the link, choose how long it works and any limit on registrations, then choose what the form asks for: customer photo and CNIC photos (required or optional), room choice and the hostel banner. Create link opens its QR code; copy the link or send it by WhatsApp or email. People who register appear in Residents without a room, and you and staff who can open Residents are notified.
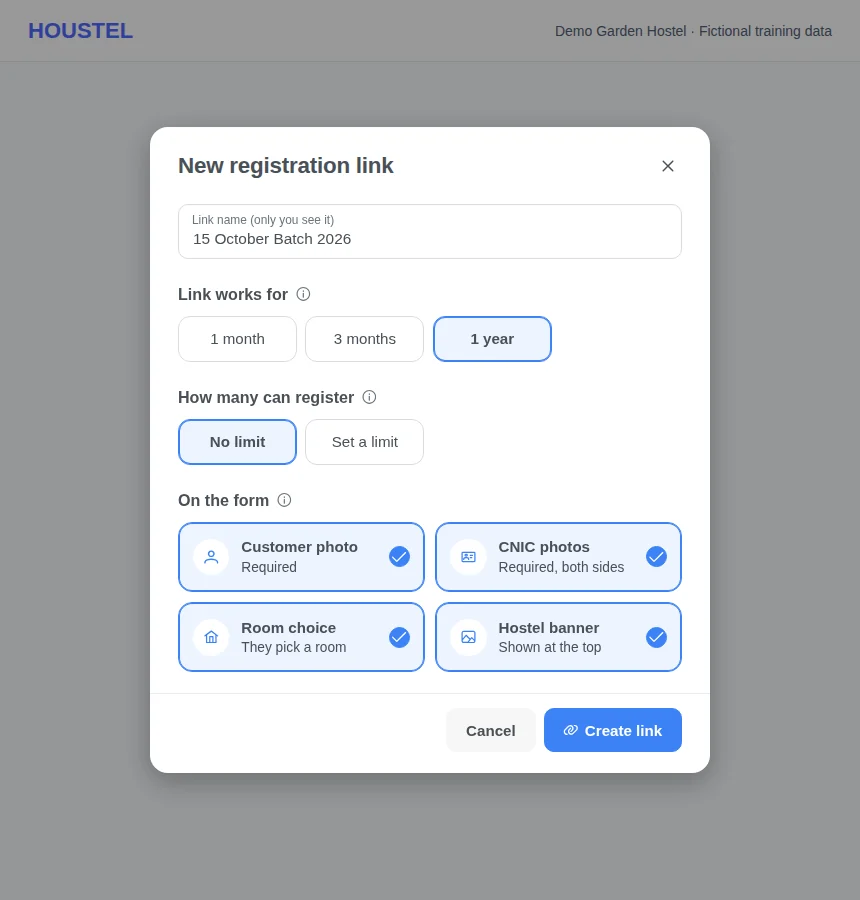
Or let people register themselves · Example with dummy data. Select the image to enlarge. -
Assign the stay
Create a booking with the room, dates, rent and agreed charges. The panel shows the first payment (a part first month is charged by the day) and, with a planned check-out, every bill and the whole stay. A planned check-out only notes the day; the resident stays and is billed until you check them out. A check-out less than a month away makes it a Daily booking; choose Keep monthly to undo that. Review opening dues and deposit separately from new payments.
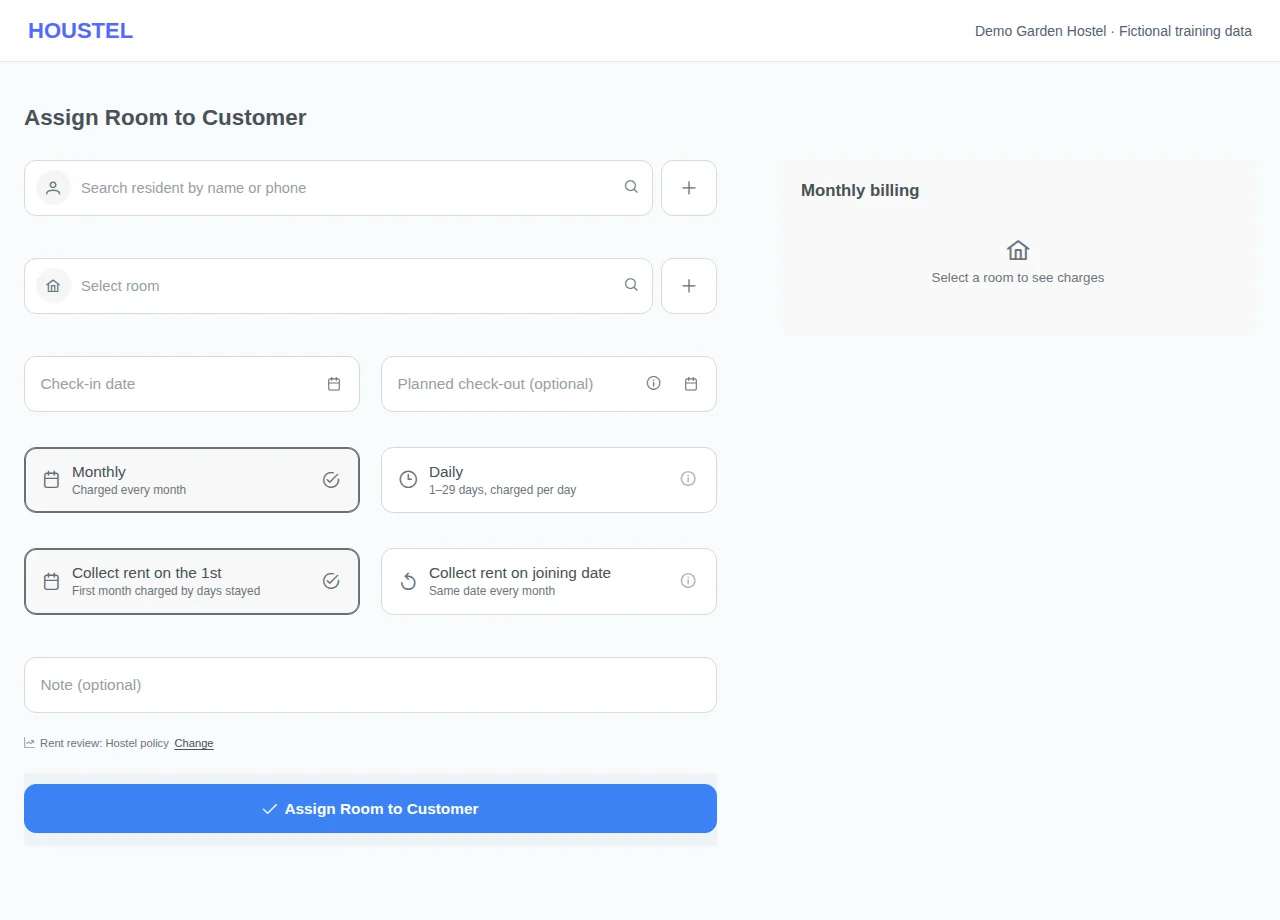
Assign the stay · Example with dummy data. Select the image to enlarge. -
Move someone now, or plan it
Residents → Change Room → Change a room now (or Plan for later). Move one resident or swap two, pick the room, check the new monthly charges, then choose When: Today moves them now; Tomorrow or Another day (up to six months ahead) saves a plan and nothing changes until that day.
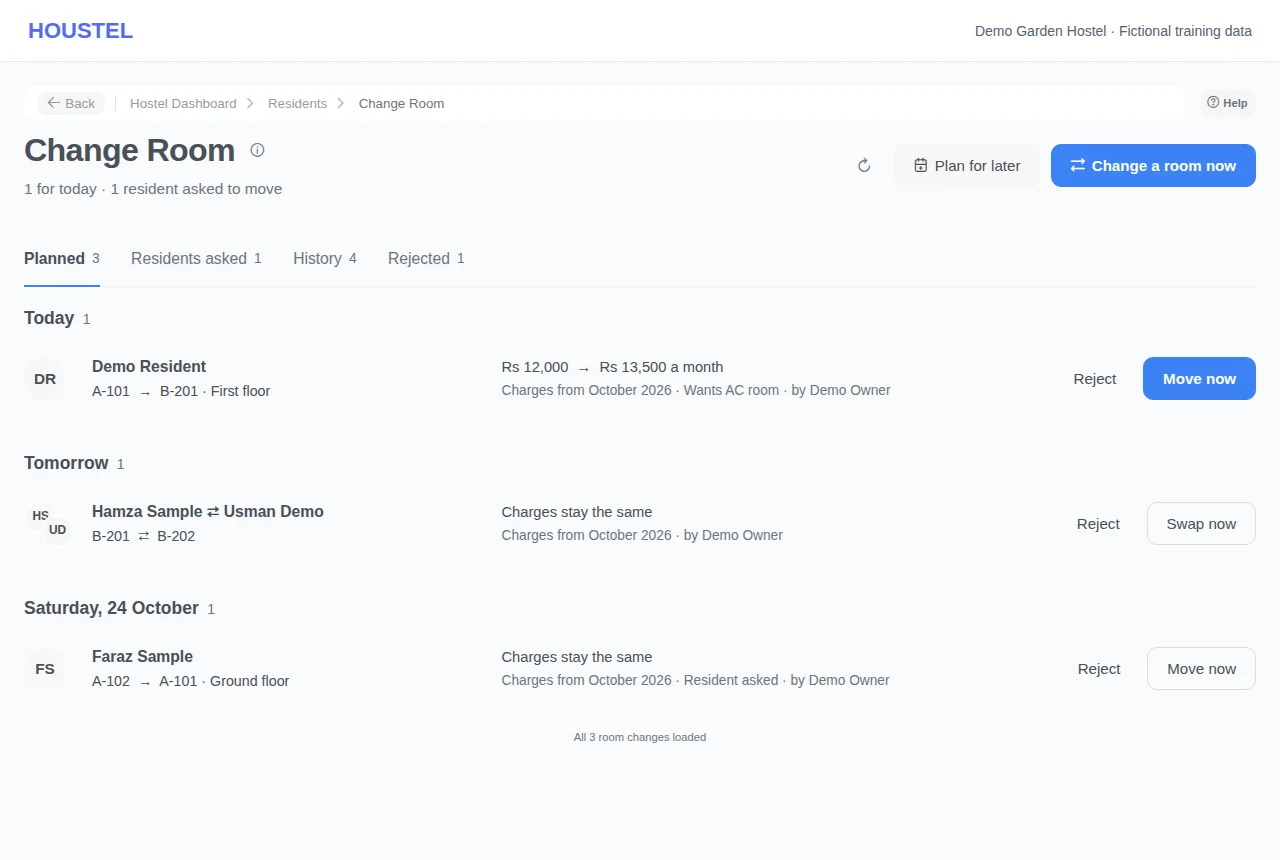
Move someone now, or plan it · Example with dummy data. Select the image to enlarge. -
Carry out or reject a planned change
On its day the plan waits under Planned and the sidebar counts it beside Change Room, with any earlier plan nobody carried out. Move now (or Swap now) shows the rooms, charges and whether the resident is told; confirm to move them. Reject drops it and nobody moves.
-
See every room change made
History lists every move and swap made in the hostel (on the spot, from a plan or for a resident's request), one row per resident with the rooms they went through and how, when and by whom the last change was made. N room changes opens each of that resident's changes. A name opens the resident's payments page; a room opens the room.
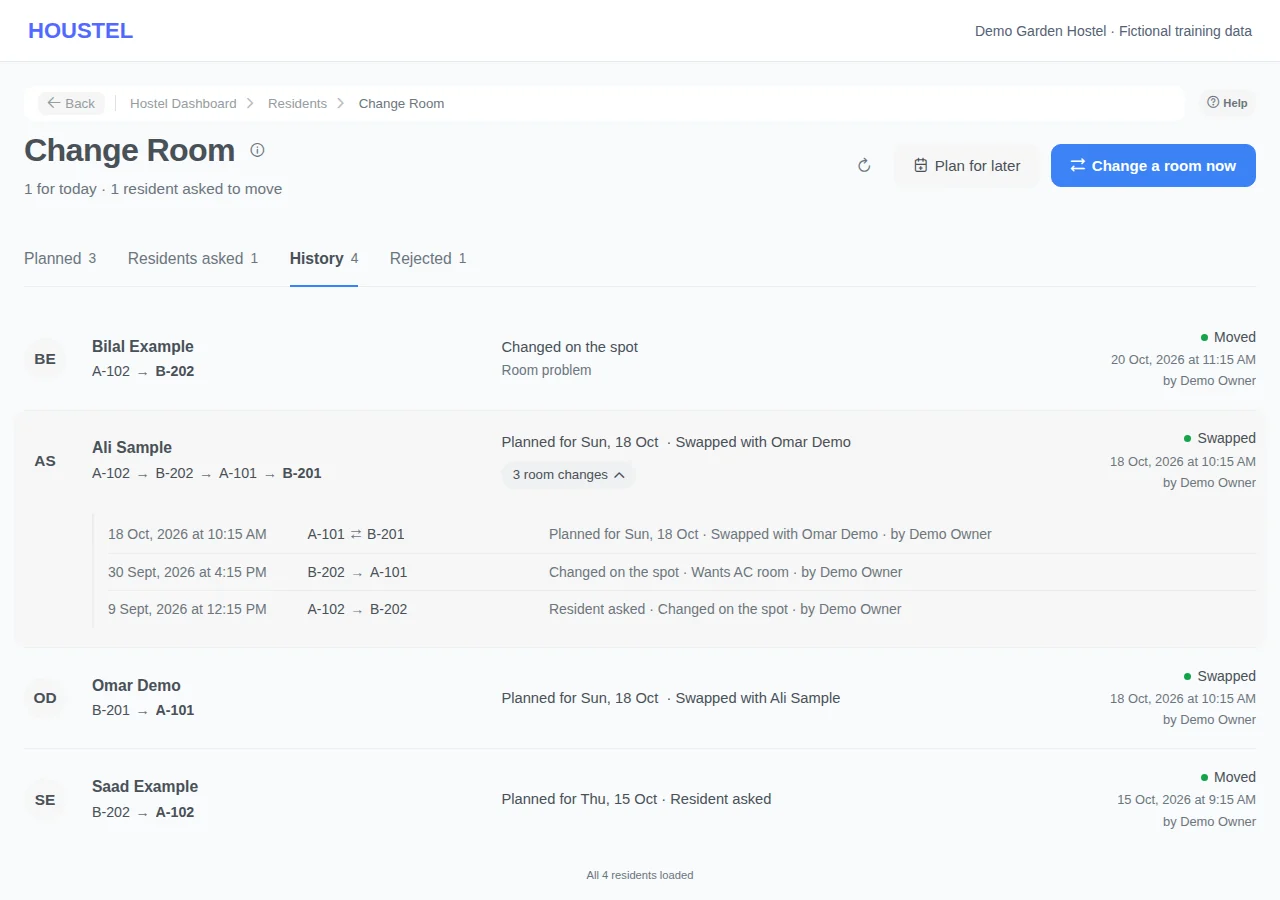
See every room change made · Example with dummy data. Select the image to enlarge. -
Answer a resident who asked to move
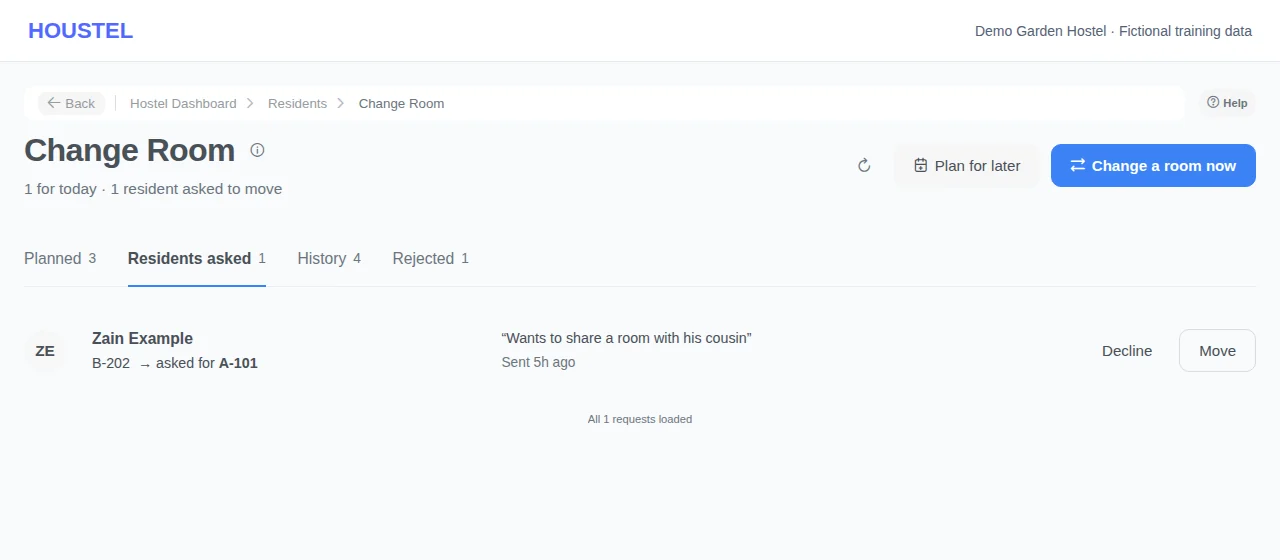
Residents asked lists requests residents sent from their account. Move opens the same steps on the room they asked for: moving today completes the request, planning a day approves it and tells them the day. Decline asks for a reason the resident sees.
Answer a resident who asked to move · Example with dummy data. Select the image to enlarge. -
Plan a check-out
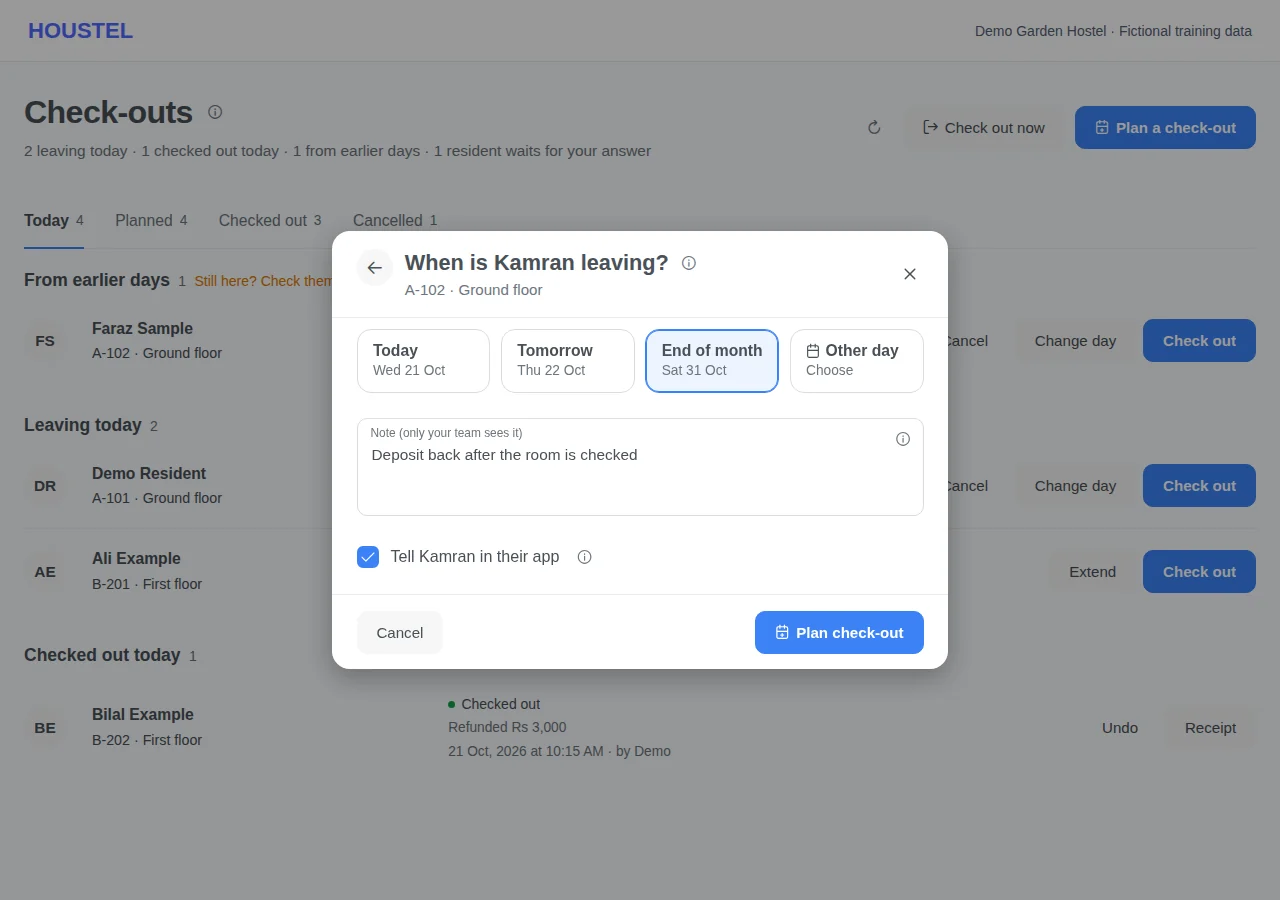
Residents → Check-outs → Plan a check-out. Pick who is leaving and the day (Today, Tomorrow, End of month or Other day, up to two years ahead), add a note only your team sees, and choose whether the resident is told in their app. Nothing is settled and nobody leaves: they keep the bed and are billed until you check them out. A resident who already has a day planned keeps one plan; picking them changes its day.
Plan a check-out · Example with dummy data. Select the image to enlarge. -
Act on the day
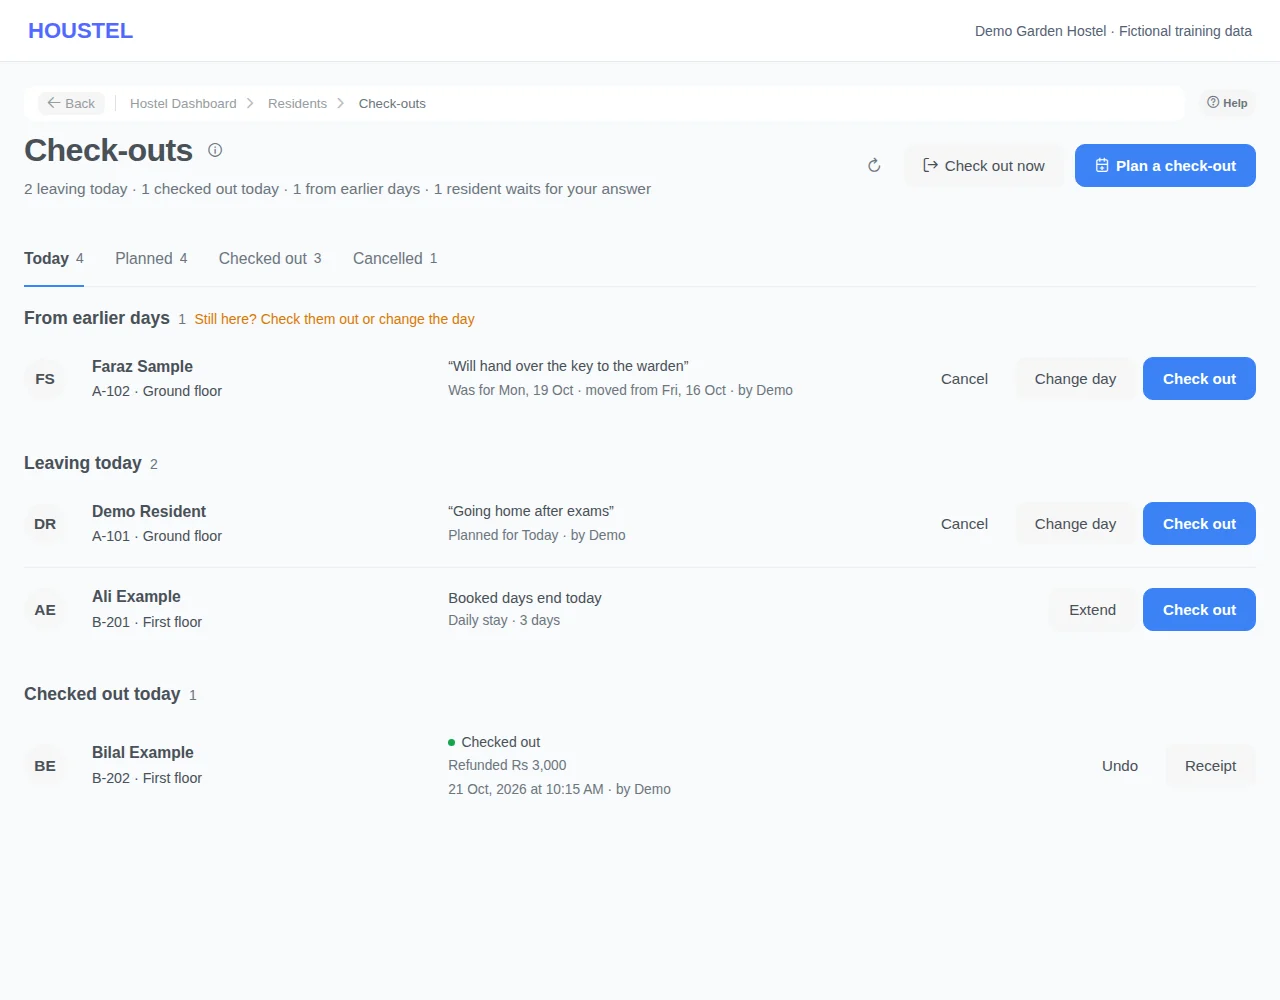
Today lists who is planned to leave today, daily stays ending today, plans from earlier days still waiting, and check-outs done today; the sidebar counts them, amber while some wait. Check out opens the check-out page on the planned day. Change day moves the plan, Cancel calls it off (they stay on), Extend adds days to a daily stay, Undo cancels a check-out done today.
Act on the day · Example with dummy data. Select the image to enlarge. -
Answer a resident who asked to leave
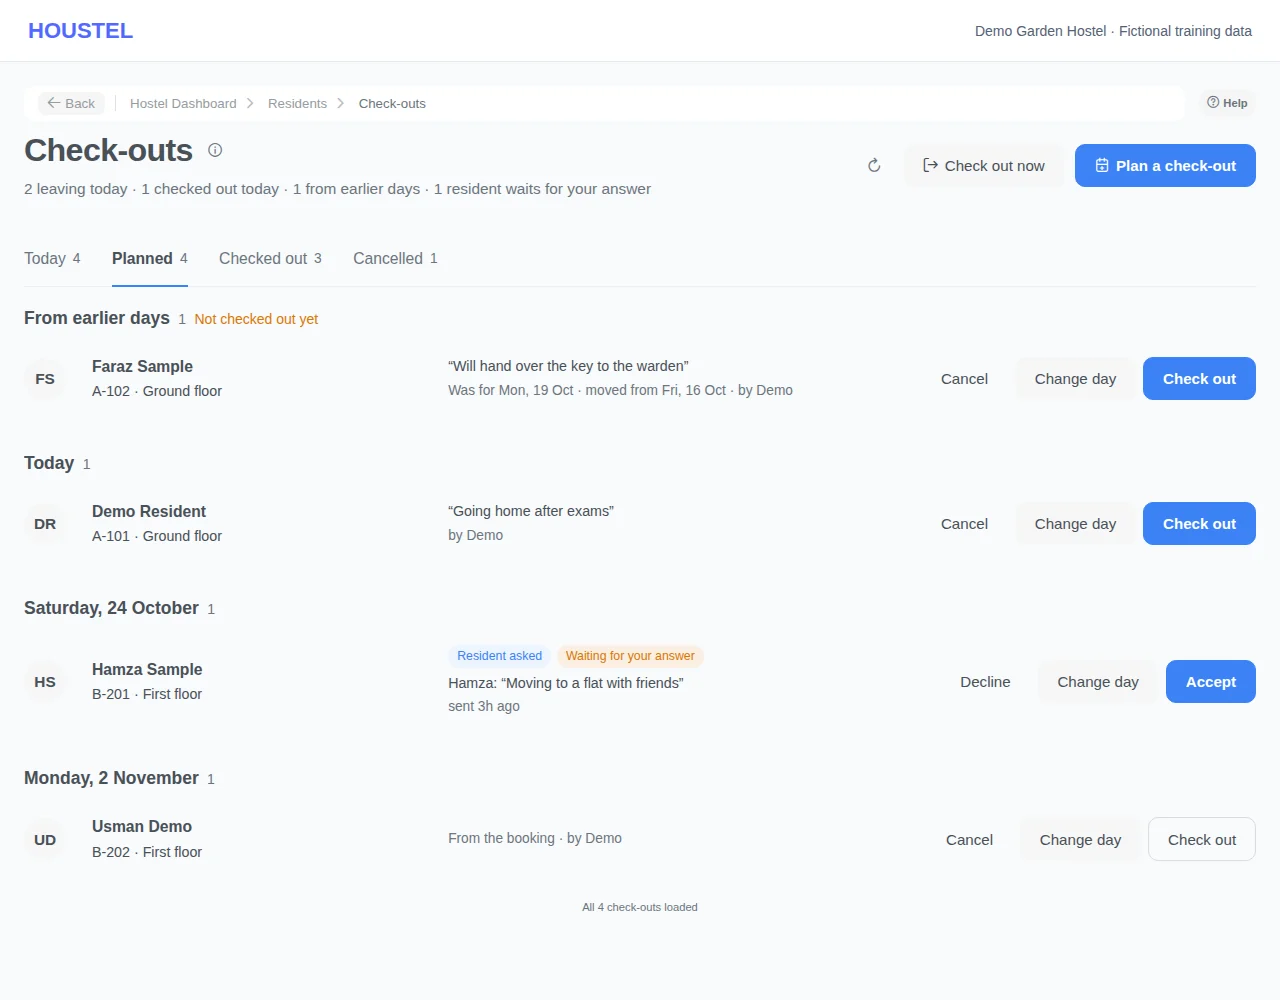
A check-out request a resident sends from their account appears among the planned check-outs, on the day they asked, tagged Resident asked and Waiting for your answer. Accept agrees to their day and tells them; Change day answers with another day; Decline asks for a reason the resident sees and removes the plan made for it. On the day itself, Check out answers it. A day you had already planned keeps the request attached: Accept moves it to their day, Decline keeps yours.
Answer a resident who asked to leave · Example with dummy data. Select the image to enlarge. -
Check them out
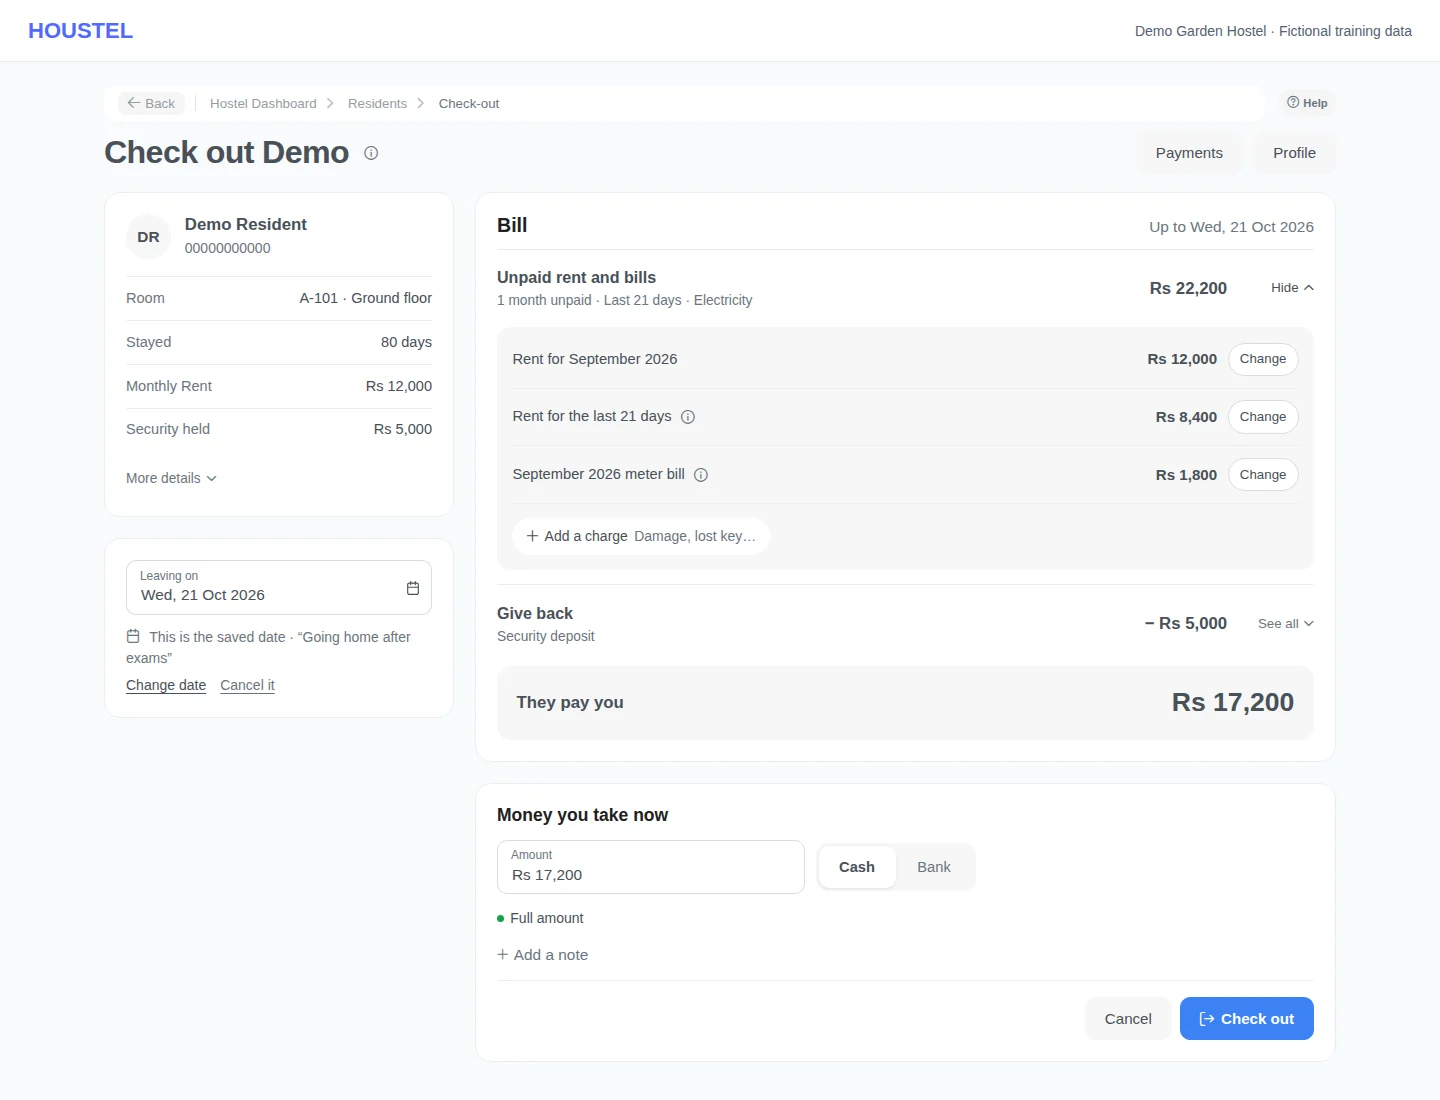
The check-out page opens on the planned day. The Bill shows Unpaid rent and bills, minus Give back (deposit, rent paid ahead), and what they pay you or you pay them; See all lists a line's items and Change opens one: a smaller amount or Don't charge for a month, less deposit to keep some for damage, Give back later for a refund not handed over today. Add a charge or Add something to give back adds your own line. Choose Cash or Bank once for the whole check-out; taking less shows what stays unpaid, and Check out anyway lets the rest go. Old dues and extra charges are not in the bill; one Not in this bill line shows them. Only save the date saves the day without settling. Checking out finishes the stay's plan; Cancel Checkout on the receipt undoes it and calls the plan off, Edit Checkout undoes it to redo it.
Check them out · Example with dummy data. Select the image to enlarge. -
Find someone who has left
Checked out lists everyone whose stay has ended, the one who left last first, with search and sorting. Receipt opens their check-out and Book again starts a new booking. No check-out recorded marks a stay that ended on its date without a settlement; Record check-out settles it.
-
Handle daily stays and old balances
Choose Monthly or Daily in the booking form according to the actual agreement. Confirm daily dates and rate, or the monthly cycle and first partial month. When migrating an existing stay, enter the agreed opening dues and separately reconcile old deposits and advances.
Handle daily stays and old balances · Example with dummy data. Select the image to enlarge. -
Narrow a page to one person
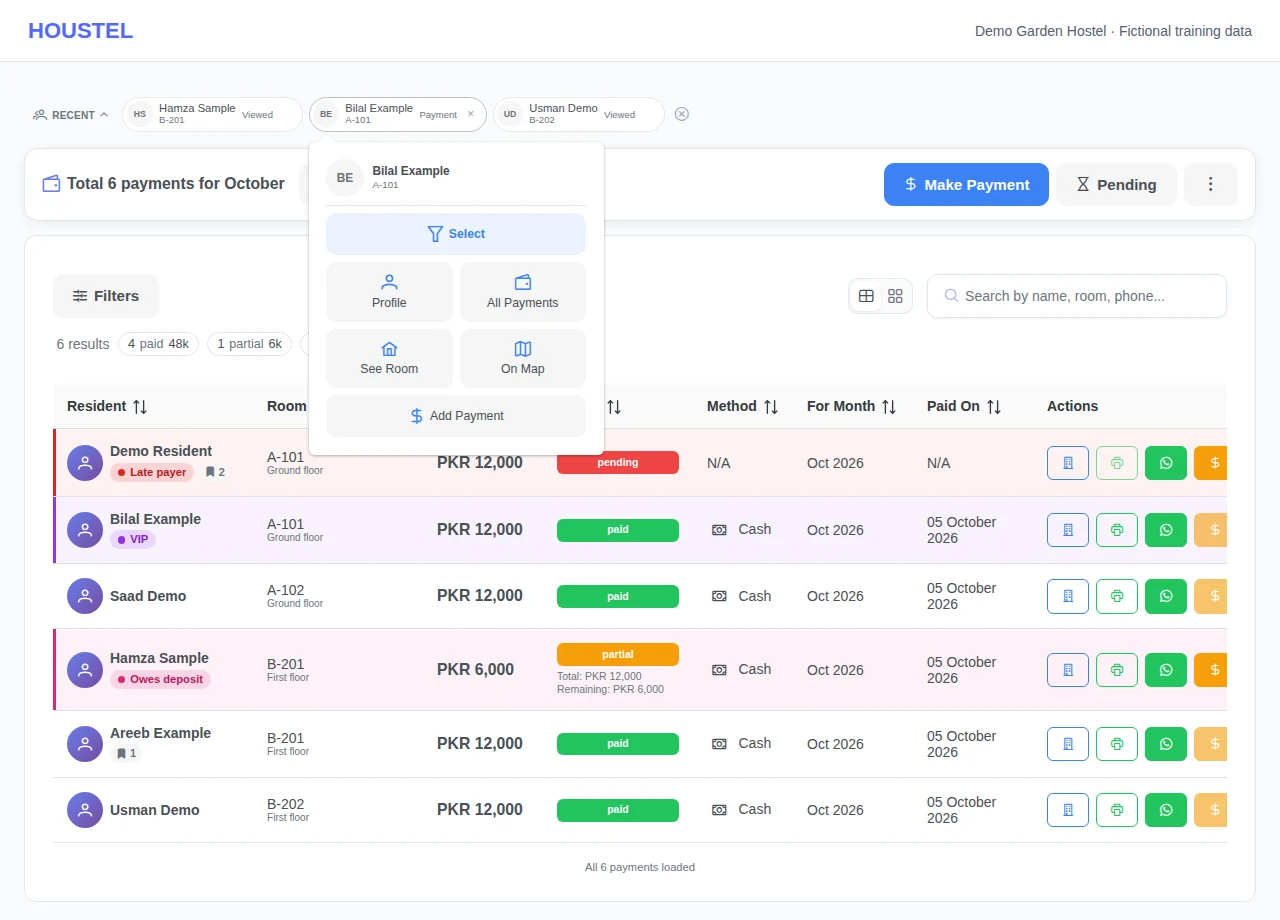
Click a name in the Recent row above the page and choose Select. Residents shows only them, Payments shows all their payments across every month, and My Hostel Map fades everyone else and scrolls to their bed. Click the name again and choose Unselect to see everyone.
Narrow a page to one person · Example with dummy data. Select the image to enlarge. -
Move between the people in one room
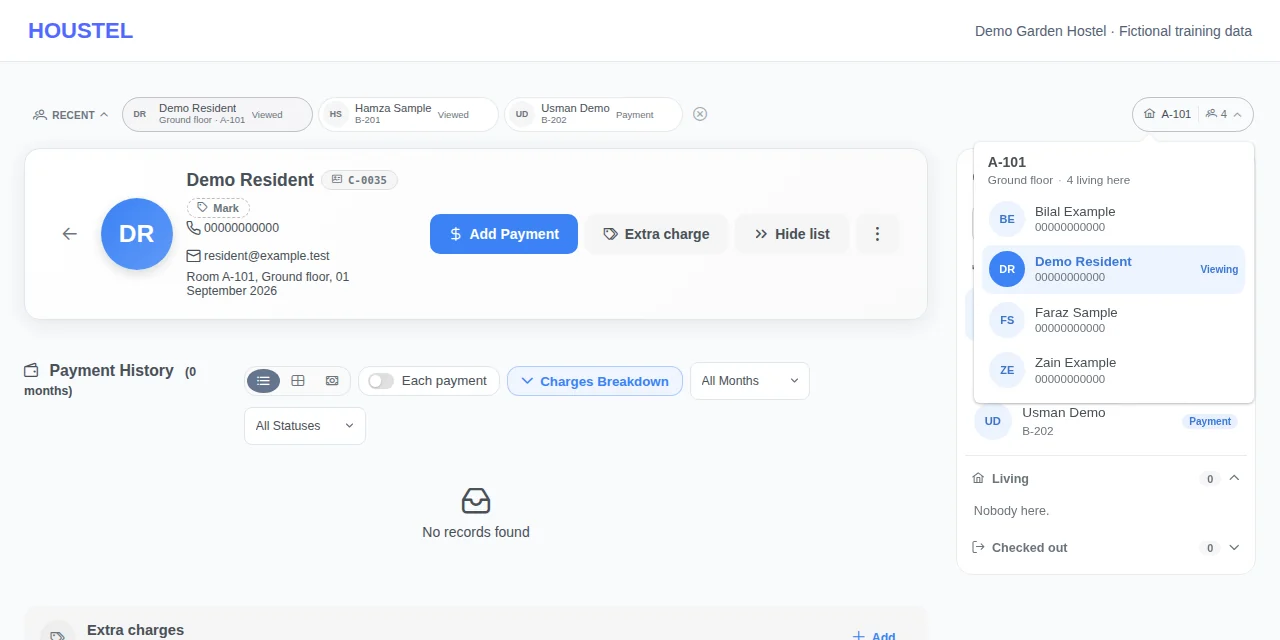
Open a resident's profile or payments page. Their room is at the right end of the Recent row above the page: hover over it (tap it on a phone) for everyone living in that room today, and click a name to open the same page for that person. Click the room to keep the list open.
Move between the people in one room · Example with dummy data. Select the image to enlarge. -
Mark a resident to remember them
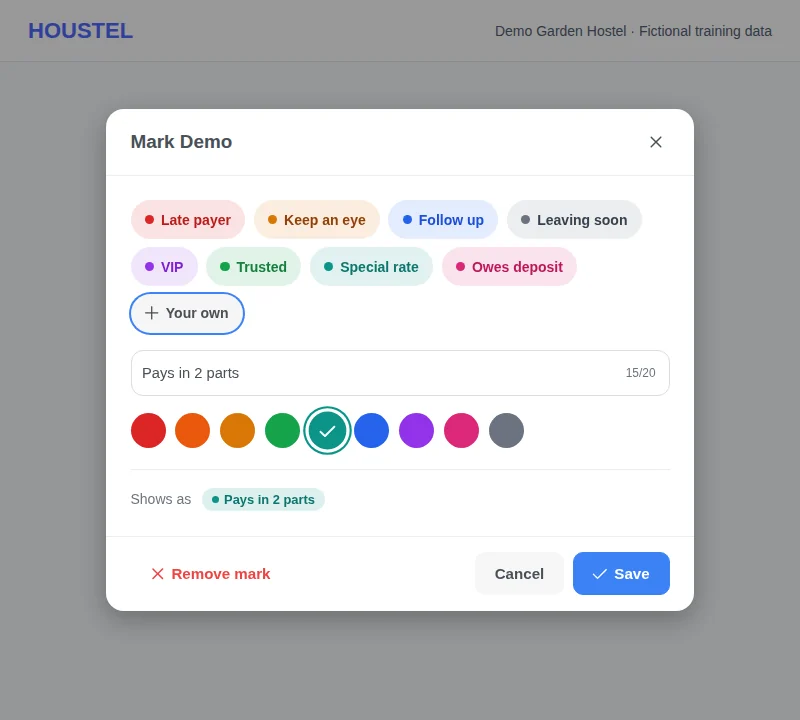
On the resident's payments page, choose Mark beside their name. Pick a ready-made status or type your own (up to 20 letters), pick a colour and save. Click the mark later to change or remove it. Longer reminders go in Keep Notes, where Add can also set the mark.
Mark a resident to remember them · Example with dummy data. Select the image to enlarge. -
Spot marked residents
Payments, Residents and My Hostel Map show the mark beside the name and tint the row, card or bed in its colour. A bookmark with a number means the resident has notes; hover over it to read the latest.
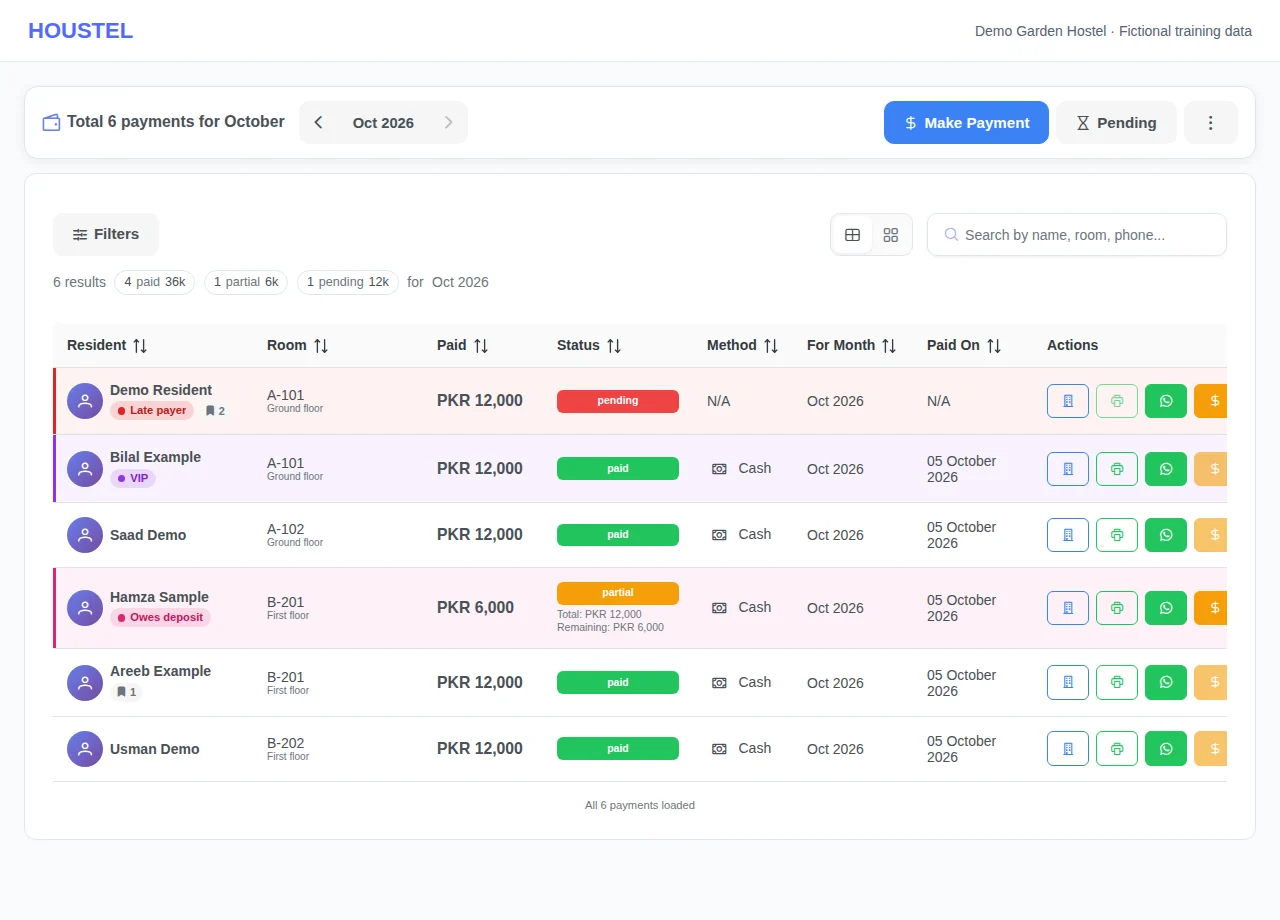
Spot marked residents · Example with dummy data. Select the image to enlarge.
Before you finish, and when something goes wrong
- A resident profile alone does not occupy a bed. Confirm the booking after a save or interruption.
- Marks and notes are for your team and never shown to residents. Changing a mark needs permission to edit residents; staff without access to bookings see only how many notes there are. If a note saves but its mark does not, the note is kept and you are told: set the mark again from the Mark button.
- A registration link's name and its four form boxes can be changed with the pencil; how long it works and its limit cannot. A change also applies to anyone who already has the form open when they press Register. Links made before the photo box existed keep the photo optional until you switch it on. An expired or full link can be renewed with the same address and QR code. The room someone picks is a request, not a held bed.
- Select is offered only on Residents, Payments and My Hostel Map. Someone with no room yet appears on Not Assigned, and the map says when a person has no bed on it. Unselect returns Residents to your tab and Payments to your month and status.
- The room list shows the same people as the Living tab for that room: someone who has checked out, or who has not joined yet, is not on it. A checked-out resident's payments page still shows the room they left and who lives there now. Someone with no room has no room button. Staff need access to Residents to open the list; without it the room is plain text. If it cannot be loaded, choose Try again.
- A plan never moves anyone on its own. Each resident can have one plan at a time; a plan cannot be carried out after the resident checked out or was moved another way since it was made: reject it and plan again. Charges you left alone in a plan keep whatever the resident pays on the day of the move. The resident is told when the move is made, not when it is planned; rejecting a plan made for their own request turns the request down and tells them. Staff need permission to edit bookings to move, plan, carry out or reject.
- Guardians are kept per hostel: another hostel, or another of your branches, never sees them. Portal access is refused without an email, or when the email belongs to another Houstel.pk account (a resident, staff member or owner); the email cannot be changed while access is on. If the invitation email fails, access is still given: send it again from the card. Staff need Residents to manage guardians, and Resident logins & passwords with Edit to give or end portal access.
- Edit Booking cannot switch monthly and daily after a payment is recorded, and changes when rent is collected only through Change Billing Cycle once payments exist. The planned check-out can be moved or cleared with the × (the resident is told); a day already gone is refused for someone still living there: check them out instead.
- A planned check-out never checks anyone out, and its day passing changes nothing: the resident stays living and billed and the plan waits under From earlier days. One plan per stay. A plan cannot be made for a stay that has ended or been checked out; the page says why. Daily stays end with their booked days unless extended. The resident is told when a check-out is planned, moved or cancelled (unless you untick it) and reminded the day before; you and staff who handle bookings get one notice each morning. Staff need permission to view bookings to open Check-outs and to edit bookings to plan, change, cancel or check out.
If a save times out, check the record before repeating it. If access is denied, ask the owner to review your hostel assignment and permissions. Never share your login to work around an access restriction.
Related help
Almost everything else in the dashboard (rent, dues, receipts, occupancy, your profit figure) is built out of what you enter here. It is worth understanding the one idea behind this page before you start adding people.
A person, and a stay
Houstel.pk keeps two separate things:
- The resident, who they are. Name, phone, ID, guardian's number, home city.
- The booking, one stay. Which bed, from when, at what rent.
That is why adding somebody and giving them a bed are two steps. It looks like extra work the first time and saves you constantly afterwards: a resident who moves room, leaves and comes back next term, or changes rent keeps one record with the whole history under it, instead of turning into three half-people in your register.
Adding a resident
Residents → Add New Customer. The details worth filling in properly:
| Detail | Why it earns its keep |
|---|---|
| Phone number | How the resident signs in to see their own dues and receipts, and where reminders go. Get this one right. |
| CNIC / B-Form | Your record of who is actually living in the building. |
| Father's name and guardian's phone | The number you will be very glad to have at 2am one day. For more than one number, a relation or a CNIC, add guardians. |
| Home city and institution | Tells you over time where your residents come from, which is useful when you decide where to advertise. |
| Optional. Residents without one can still sign in with their phone number, so do not invent an address to fill the box. |
Do not type a hundred people in by hand. There is a bulk import for existing residents, and support will run the first one for you. Send us your list in whatever form you keep it.
After you press Register Customer
A window asks what to do next:
- Assign a room opens the booking form for this person.
- Add guardian details adds a parent or relative now. It is optional: skip it and add them later from the profile.
- Register another customer empties the form for the next person, for when you are entering a group and giving rooms later.
The window stays open until you choose. The form behind it still holds the person you just saved, and saving them a second time would only be refused as a duplicate.
Guardians: who to call about a resident
A guardian is a parent, relative or anyone else you would call about a resident. Each resident can have up to five. The Guardian's phone box on the registration form holds one number; a guardian keeps more: name, relation, phone, CNIC, email and a photo, and can be given a login of their own to follow the resident's payments.
Adding a guardian
- Right after registering. Choose Add guardian details in the window above. If you typed a father's name and guardian's phone on the form, they are already filled in with Father picked; change whatever is wrong. After you save, the window comes back and names who you added, and Add another guardian adds the next.
- Any time later. Open the resident's profile. The Guardians box sits under Family information; choose Add guardian. For a resident with no guardian yet, the guardian's phone from the registration form is filled in for you.
Only the name is required. A phone number must be the full 11-digit mobile number, such as 0300-1234567, and a CNIC all 13 digits. The photo can be a JPG or PNG up to 5 MB, from the camera or the gallery.
The pencil beside a guardian changes their details; the bin removes them after you confirm. Removing a guardian also ends their portal access at once.
Guardians are kept per hostel. A resident who has stayed at another hostel on Houstel.pk keeps one profile, but the guardians you add are never shown to that hostel, and theirs never show here. Each of your own branches keeps its own list too.
Giving a parent their own login
Switch on Parent portal access in the guardian's window and save. It needs an email address. The parent can then sign in at the same Houstel.pk sign-in page and see, for this resident at your hostel only: the room and joining date, the payments and dues the resident sees in their own account, and their gate attendance if the resident is on your attendance machine. They can look but not change anything.
- New to Houstel.pk. They get an email with a link to choose their own password. The link works for 3 days, and only the most recent one works. Until they choose a password the guardian shows Invite sent, with a button to send the email again; after that, Portal access.
- Already a parent on Houstel.pk, for a brother or sister here or at another hostel. They get an email saying they can now see this resident too, and sign in as usual.
Neither you nor your staff ever see or set the parent's password. To take access away, open the guardian with the pencil, switch Parent portal access off and save; it ends at once.
- No email. Add the guardian's email address first.
- The email belongs to another Houstel.pk account, such as the resident's own, a staff member's or an owner's. Use a different email for the guardian.
- Changing the email. Not possible while access is on. Switch access off, save, change the email, then switch it back on.
- The email did not arrive. Access is given either way. Ask them to check spam, then send it again with the button beside Invite sent.
Staff who can work with Residents can add, change and remove guardians. Giving or ending portal access also needs Resident logins & passwords with Edit, which owners have and staff only have if you give it to them; without it, staff do not see the switch. More on staff permissions →
Letting people register themselves
Instead of typing someone in, send them a registration link. They open it on their phone, fill in their own details and press Register. They do not need an account or a password, and they appear in Residents without a room, ready for you to give them one.
Making a link
- Open your links Residents → Add New Customer → Share Link. The panel lists the links you have made, with how many times each was opened and how many people registered through it.
- Choose Generate New Link Give the link a name that only you see, such as the batch it is for. Choose how long it works (1 month, 3 months or 1 year) and whether there is a limit on how many people can register. With Set a limit, type the number; the link will not be created without one.
-
Choose what the form asks for
Four boxes, each switched on or off with a click. They all start on, except the banner when
your hostel has none.
- Customer photo. On: the person must add a photo of themselves, from the camera or the gallery, before they can register. Off: the photo is optional.
- CNIC photos. On: the front and back of their CNIC are required. Off: optional.
- Room choice. On: they pick the room they want, full rooms included. Switch it off if you assign rooms yourself.
- Hostel banner. Shows your banner at the top of the form. Without a banner on your hostel the box cannot be switched on; upload one on your hostel dashboard first.
- Choose Create link The link's QR code opens, ready to download or print. From the panel you can copy the link or send it by WhatsApp or email.
When somebody registers, you and the staff who can open Residents get a notification and an email. Your own email includes their phone number and email address; staff emails do not. The room they picked is only a request: no bed is held, and the room is filled in for you when you assign them a room, where you can still choose another.
The pencil beside a link changes its name and the four boxes. How long it works and its limit cannot be changed afterwards. A change applies to everyone who opens the link from then on, and also to anyone who already has the form open when they press Register: if you make the photo required, they are asked to add one. Links made before the photo box existed keep the photo optional until you switch it on.
A link stops working when its time runs out, when its limit is reached or when you switch it off. While people keep registering through it, it stays open at least a month after the latest one. Renew opens an expired or full link again for a year, with the same address and QR code, and removes a limit that was reached; a link you switched off works again when you switch it back on. Someone who opens a link that has stopped is told why and asked to contact the hostel. Anyone whose email, phone number or CNIC is already on Houstel.pk cannot register through a link; the form says which detail is already in use.
Giving them a bed
Residents → Assign Room. Pick the resident, pick the floor and room, and set:
- Joining date. The day they move in, not the day you are typing.
- Rent. Pre-filled from the room, changeable for this one person.
- Security deposit and admission fee, if you take them.
- Extras. Mess, AC, laundry, whatever applies to this resident.
- Billing. Whether their month runs with the calendar or from their joining date. More on billing cycles →
- Planned check-out. Optional. It only notes the day they plan to leave: they stay, and are billed, until you check them out (see Check-outs). The × in the box empties it again.
The panel on the right shows the first payment: the one-time charges and the first month. When the first month is part of a month, for someone joining on the 21st with rent collected on the 1st, it is only the days they stay, at a month's charges ÷ 30 × days. With a check-out date it also shows each bill to the end of the stay and the whole stay. These are estimates; nothing is charged until you record a payment.
Leaving within a month? When the check-out date comes before a whole month has passed, the booking switches itself to Daily (1–29 days, charged per day) with the same dates, and says so. Choose Keep monthly under the dates to leave it monthly.
Save, and the bed is taken. Your map, your availability and your public listing all update themselves, and you can start recording their rent against that booking. The resident also gets their own account, where they can see the room and rent you just set.
Changing a booking later
On the resident's payments page, More → Edit Booking opens the same form with their booking in it. A few things are fixed once money is involved:
- Monthly or daily cannot change after a payment is recorded. Make a new booking instead.
- When rent is collected changes through Change Billing Cycle on their payments page once payments exist, so that months already paid stay as they were.
- The room changes through Change room beside it, which opens the same move as Residents → Change Room.
- A new price asks from which month it applies. Months before it keep the old price.
The planned check-out can be moved to another day, or cleared with the × for a resident who is staying after all; the resident is told either way. A day that has already passed is not taken for someone still living with you: check them out instead, so their dues and deposit are settled. A booking that is completed or cancelled opens read-only.
What the statuses mean
| Status | Meaning |
|---|---|
| Pending | Agreed but not settled, so you are holding the bed. It counts as taken, so nobody else is promised it. |
| Confirmed | They are living with you, or arriving on a date you have set. This is the normal state. |
| Completed | They have checked out. The bed is free, and their history stays. |
| Cancelled | The stay never happened. The bed is released. |
“Living” means the dates say so: someone whose stay has started and not ended. That is the same count the free plan's 20 is measured against, so it always matches what you see on the residents page. A planned check-out does not change it: someone planned to leave on the 30th is living until you check them out, however late that is.
Moving somebody to another room
Move the existing booking; do not create a second one. Their payments, dues and deposit stay attached to them, the old bed frees up and the new one fills, and the change is recorded so you can see later when they moved and why.
Open Residents → Change Room. The page lists every room change waiting for you, and its two buttons start a new one: Change a room now and Plan for later. Both lead through the same steps: move one resident or swap two, pick who, pick the room, check the new monthly charges, then choose When.
- Today moves them straight away.
- Tomorrow or Another day, up to six months ahead, saves a plan instead. Nothing changes until that day.
Planned room changes
A plan never moves anybody on its own, because the resident may not turn up or the room may not be ready. On its day it waits under Planned, and the sidebar shows a number beside Change Room (and on Residents). The number goes once you open Change Room or your bell, and comes back when another plan or request falls due. A plan from an earlier day that nobody carried out stays at the top, under From earlier days, until you deal with it.
- Carry it out Press Move now (or Swap now). Check the rooms, the new charges and whether the resident is told, then confirm. You can do this before the planned day too; the room then changes that day.
- Or reject it Reject drops the plan and nobody moves. Rejected plans stay under Rejected.
History lists every room change made in your hostel: the ones made on the spot, the planned ones once carried out, and the ones made for a resident's own request, including moves made from the Houstel app. There is one row per resident, the one moved most recently first, showing the rooms they went through and how, when and by whom their last change was made. A resident moved more than once has a room changes button that opens every change, with the reason and who swapped with them. Click a name to open that resident's payments page, or a room to open the room.
The new charges start from the month under Charges from, which follows the day you picked unless you change it. A charge you left alone is not frozen: the resident keeps paying whatever they pay on the day of the move, so a rent change made in between is not undone. The resident is told (by email if they have an address, and in their Houstel app) when the move is made, not when it is planned.
Each resident can have one plan at a time; carry out or reject it before planning another. A plan cannot be carried out once the resident has checked out, or after they were moved some other way since it was made: the page says why, so reject it and plan again if needed.
When a resident asks to move
Residents can ask for another room from their own account. The request appears under Residents asked on the Change Room page (and in Customer Requests) and counts in the sidebar until you answer it. Move opens the same steps on the room they asked for; you can still pick another room, or swap them with someone instead.
- Moving them today completes the request.
- Planning a day approves it and tells them the day in their app. If you later reject that plan, their request is turned down and they are told the move was called off.
- Decline asks for a reason, which the resident sees.
Nobody moves themselves. Staff need permission to edit bookings to move residents, plan, carry out or reject a change; declining a request also needs access to Customer Requests.
Check-outs: who is leaving
Residents → Check-outs holds everything about residents leaving: who is leaving today, check-outs planned for later days (residents' own requests among them), and everyone who has left. The Checked Outs tab on the Residents page opens it too.
Planning a check-out
When a resident tells you the day they will leave, plan it. A planned check-out only notes the day: nothing is settled, the bed stays theirs and their rent keeps being billed until you check them out. People stay a few days longer, leave early or change their minds, and the plan moves with them.
- Pick who is leaving Press Plan a check-out and choose the resident. Someone with a day already planned shows it beside their name; picking them changes that day rather than adding a second one.
- Pick the day Today, Tomorrow, End of month or Other day for a calendar, up to two years ahead. A day already gone is not taken; if they have left, check them out instead.
- Add a note if you want For you and your staff only, for example what was agreed about the deposit. The resident does not see it.
- Tell them, or not With the Tell … in their app box ticked (it starts ticked) the resident gets a notice with the day, a reminder the day before, and a notice if you change or cancel it.
You can plan from two other places too: Only save the date under the date on the check-out page, and the Planned check-out box on Add New Booking and Edit Booking. A day from today on entered there is saved as a planned check-out; changing it moves the plan and emptying it cancels the plan. Check-out dates that were entered on bookings before planned check-outs existed, for a day still to come, now show here as planned check-outs.
On the day
Today lists everyone planned to leave today, daily stays whose booked days end today, and everyone checked out today. A plan from an earlier day that nobody acted on stays at the top, under From earlier days, until you do. The number beside Check-outs in the sidebar counts all of them, plus residents' requests still waiting for your answer, and is amber while any of them wait for you. Each morning you, and staff who handle bookings, get one notice naming who is leaving that day.
- Check out opens the check-out page on the planned day, ready to settle. See Checking somebody out.
- Change day moves the plan, for a resident staying longer or going sooner. The row shows the day it moved from.
- Cancel calls the plan off: they stay on and nothing else changes. The reason you type is for your team; the resident is told the check-out is cancelled unless you untick it.
- Extend, on a daily stay, opens the booking to add days. A daily stay ends with its booked days unless you extend it or check them out.
- Undo, on someone checked out today, opens their check-out to cancel it. Receipt opens it to read or print.
Planned lists every waiting plan by day, the earliest first, and Cancelled the plans called off, with who did it and why.
When a resident asks to leave
Residents can send a check-out request with the day they want from their own account, which gives you their notice in writing with a date on it instead of a conversation on the stairs. It goes straight onto this page as a planned check-out on the day they asked, tagged Resident asked and Waiting for your answer, and you are notified. It no longer appears in Customer Requests.
- Accept agrees to their day: the tag goes, and they are told.
- Change day opens the plan window on the day they asked; saving another day answers them with that day.
- Decline asks for a reason, which the resident sees. The plan made for their request goes with it.
- On the day itself, Check out takes the place of Accept, and checking them out answers the request.
- If you had already planned a day for them, their request is attached to that plan and the row shows the day they asked for. Accept moves the plan to their day; Decline keeps your day.
- If they withdraw the request from their account, the plan made for it is removed.
The resident sees the planned day on their check-out page, with a way to ask for a different one.
Everyone who has left
Checked out lists everyone whose stay with you has ended, the one who left last first. Search by name, room, phone or CNIC, or sort by longest stay or by name. Receipt opens their check-out and Book again starts a new booking for them. No check-out recorded means the stay ended on its date, for example a daily stay that ran out, without a settlement; Record check-out settles it now.
Staff need permission to view bookings to open Check-outs, and to edit bookings to plan, change or cancel a check-out, answer a resident's request or check someone out. Nobody is checked out by a plan, a date or the app on its own.
Checking somebody out
Check-out is one screen, and doing it properly is what keeps your books clean:
- Set the leaving date It starts on the planned day when there is one. The bed frees from that date, not from the moment you press the button.
- Settle what is owed Any rent still outstanding for their final month is shown.
- Deal with the deposit Return it, keep part of it, or hold it to pay later. How deposits work →
- Add any deductions Damage, a lost key, unreturned items. These are recorded on the check-out itself.
On the left are who is leaving, a few facts about the stay and the day they leave; on the right the Bill, then the money. The bill is two lines and the answer: Unpaid rent and bills, minus Give back (the deposit and any rent paid ahead), equals They pay you or You pay them. See all on a line lists what is in it, and Change on one item opens its box:
- A month or bill: type a smaller amount, or tick Don't charge to let it go. What you let go shows under the line as “let go”.
- The security deposit: type less to keep some for damage, or tick Give back later if you are not handing it over today; it stays on their payments page as money you owe.
- Extra rent paid: give back less, tick Don't give back to keep it, or Give back later.
- Add a charge (damage, a lost key, cleaning) and Add something to give back add your own lines, each with what it is for and the amount.
Under Money you take now, the amount starts at the whole bill; choose Cash or Bank once for the whole check-out (with Bank, pick the account it went into). Taking less? The page shows what stays unpaid; tick Check out anyway and the rest is let go. When the deposit is more than the bill, the same box reads Money you give now. Notes are behind Add a note. Check out asks once more, with the day and the money, before anything is saved.
Old dues and unpaid extra charges are not part of the bill. When they have some, one line says Not in this bill with the amount; open it to see them and take them on their payments page. More details under the stay adds the check-in day, billing and every charge on the booking, and Payments at the top lists what they have paid without leaving the page.
Not leaving yet? Not leaving today? Only save the date under the date saves the day as a planned check-out without settling anything. A check-out planned for the stay shows under the date with Change date and Cancel it. Settling a later day is still possible, for someone paying up the night before: the stay is closed now and they keep the bed until that day.
Checking someone out finishes the plan for that stay and answers their own check-out request. A check-out can be undone from its receipt with Cancel Checkout, which also calls the plan off; Edit Checkout undoes it to redo it straight away, and the plan waits again until you do.
The Recent row
Above Residents, Payments, My Hostel Map and the other resident pages sits a Recent row: the residents you worked on last, newest first. Click a name for the places you would go next: their profile, all their payments, their room, their bed on the map, or a new payment.
On Residents, Payments and My Hostel Map that window starts with Select. It narrows the page you are on to that one person, moves their name to the front of the row and marks it “Selected”:
- Residents shows only them, on the All tab with their name in the search box. Someone with no room yet is shown on Not Assigned.
- Payments shows all their payments, every month and status, with their name in a badge above the list.
- My Hostel Map fades everyone else, scrolls to their bed and shows a bar at the bottom saying who it is showing. If they have no bed on the map, it says so and stays as it was.
To see everyone again, click the name and choose Unselect. That takes Residents back to the tab you were on, and Payments back to its month and status (the × on the Payments badge does the same). Clearing the search box on Residents, or Show everyone on the map, also ends it.
From one resident to the others in their room
On a resident's profile and on their payments page, their room sits at the right end of the Recent row, above the page, as a small button with the number of people living in it. It is the quick way to work through a room: you do not go back to Residents and search for each roommate.
- Point at the room Hover over it, or tap it on a phone. A list opens with everyone living in that room today, in alphabetical order, each with their phone number. The person whose page you are on says “Viewing”.
- Click a name The same page opens for that person: from a profile you land on their profile, from a payments page on their payments.
- Keep the list open if you need to Click the room and the list stays while you move the pointer away. Click the room again, click anywhere else or scroll the page to close it.
The same people the Living tab on Residents shows for that room. Someone who has checked out, or whose joining date has not arrived, is not on it. For someone who has checked out, their payments page still shows the button with the room they left, and the list is who lives there now. A resident living alone sees “No one else lives in this room.” Someone with no room yet has no button. Staff need access to Residents to open the list; without it the room is shown as plain text. If the list cannot be loaded, it says so and offers Try again.
Marks and notes: remembering a resident
Some residents you need to remember for a reason: one always pays late, one is on a special rate, one is leaving at the end of the month. Two things on the resident's payments page keep that in front of you.
- A mark is a colour with a short status, such as “Late payer” or “VIP”. It sits beside the resident's name on Payments, Residents and My Hostel Map, and their row, card or bed takes its colour, so you spot them without opening anything.
- Keep Notes holds the longer story: what was agreed, what happened, what to say next time. A resident with notes shows a bookmark and the number of notes beside their name on the same three pages. Hover over the bookmark to read the latest one.
Marking a resident
- Open the resident's payments page From Residents or Payments, open the resident. Beside their name and customer number is a Mark button.
- Pick a status Choose a ready-made one (Late payer, Keep an eye, Follow up, Leaving soon, VIP, Trusted, Special rate) or Your own and type it. A status is at most 20 letters; anything longer belongs in a note. A status you made yourself is offered again in all your branches for as long as at least one resident carries it.
- Pick a colour Each status comes with a colour you can change. A colour on its own, with no status, is a mark too.
- Save The mark shows at once. Click it beside the name to change it, or choose Remove mark.
You can also set the mark while writing a note (Keep Notes → Add → Also mark this customer), or from the resident's window on My Hostel Map. If the note saves but the mark does not, you are told, and the note stays saved.
Marks and notes are for your team. Residents never see them. Anyone who can open Payments, Residents or the map sees the marks, but changing one needs permission to edit residents. Staff without access to bookings see how many notes a resident has, not what they say. A mark belongs to the person, not the stay, so it stays through a room change and is there again if they come back. Each branch keeps its own marks. The bookmark counts the notes from all of a resident's stays with you, while the payments page lists the notes of the stay it is showing.
Nothing is ever deleted
You cannot delete a resident, and that is on purpose. Someone who paid you eleven months of rent is part of your records; removing them would quietly rewrite last year's income. Past residents move out of your active list on their own once they have checked out, and stay findable when you need them: for a reference, a returning student, or a question about a deposit two years later.
In short
- A resident is a person; a booking is one stay. Adding someone and giving them a bed are two steps, on purpose.
- Get the phone number and guardian's number right. Everything else can be fixed later.
- After saving someone, choose Assign a room, Add guardian details or Register another customer. Guardians are optional and can be added later from the profile, up to five per resident.
- A guardian with an email can be given the parent portal: their own login to see this resident's room, payments and attendance at your hostel, and nothing else.
- A registration link lets people fill in their own details. You choose whether their photo and CNIC photos are required and whether they pick a room.
- Room change = move the existing booking, never create a new one. Residents → Change Room moves someone now or plans it for a later day; a plan waits there on its day for you to carry out or reject.
- Plan a check-out when a resident tells you their day: it only notes the day, and they stay and are billed until you check them out. Residents → Check-outs shows who is leaving today, plans from earlier days still waiting, and everyone who has left.
- Check out with a leaving date, settle the dues, then decide on the deposit.
- Residents can request a room change or a check-out themselves; you decide, and you pick the room and the day.
- Click a name in the Recent row and choose Select to narrow Residents, Payments or the map to that one person; Unselect brings everyone back.
- On a resident's profile or payments page, hover over their room at the right end of the Recent row and click a roommate to open the same page for them.
- Mark a resident with a colour and a short status to spot them on Payments, Residents and the map. Longer reminders go in Keep Notes.
- Nothing is deleted. Past residents stay in your history where they belong.
Common questions
What is the difference between a resident and a booking?
The resident is the person and their details. The booking is one stay: which bed, from when, at what rent. One resident can have several bookings over the years, which is how you keep a returning student's history in one place.
A resident is moving to another room. Do I create a new booking?
No. Move the existing booking to the new room. Their payment history, dues and deposit stay attached, and the beds free up and fill up on their own.
Can I import my existing residents from Excel?
Yes. There is a bulk import for residents so you do not have to type in a hostel that is already full. Support will help with the first import if you send us your sheet.
Can I flag a resident so I remember them, such as a late payer?
Yes. On the resident's payments page choose Mark, pick a status such as Late payer or VIP (or type your own, up to 20 letters) and a colour. Their name then stands out in that colour on Payments, Residents and My Hostel Map. Residents never see it. For anything longer, use Keep Notes on the same page.
Still stuck?
Tell us the screen name, what you tried and what happened. Remove personal details, passwords and private links from any screenshot.